|
Performance Steps
|
|
1. Clear the M203 grenade launcher.
|
|
2. Disassemble the M203 (figure 071-311-2125-1).
|
|

Figure 071-311-2125-1.
Components of the M203 grenade launcher
|
|
WARNING:
Before
disassembling the weapon, clear the
rifle and grenade launcher.
|
a.
Remove the quadrant sight
(if used) by loosening the knurled
screw on the right side (figure 071-311-2125-2).
|
|

Figure 071-311-2125-2.
Removing quadrant sight
|
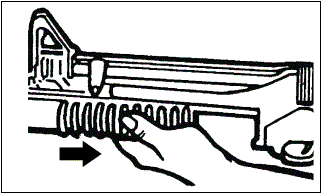
b.
Pull back the slip ring.
Lift up on the handguard and
pull it to the rear to remove (figure 071-311-2125-3).
|
|

Figure 071-311-2125-3.
Removing handguard
|
c.
Press the barrel latch and
move the barrel forward to the barrel
stop (figure 071-311-2125-4).
|
|

Figure 071-311-2125-4.
Unlocking and opening the M203 barrel
|
d.
Press the barrel stop to
release the barrel from the receiver
and remove the barrel (figure 071-311-2125-5).
|
|

Figure 071-311-2125-5.
Removing the M203 barrel
|
|
Note. Further
disassembly may be performed only by
the armorer.
|
|
3. Clean and lubricate the M203.
|
a.
Bore.
Attach a clean, dry rag to the
thong and thoroughly moisten the rag
with CLP.
Pull the rag through the bore
several times.
Attach the bore brush to the
thong, pull it through the bore
several times, and follow this with
more rags, moistened with CLP, if
needed (figure 071-311-2125-6).
Pull dry rags through the bore
and inspect each rag as it is removed.
The bore is clean when a dry
rag is removed unfouled. Pull a rag
lightly moistened with CLP through the
bore to leave a light coat of
lubricant inside the barrel.
|
|

Figure 071-311-2125-6.
Cleaning the M203 barrel
|
b.
Breech insert. Clean the face of the breech insert retainer with a patch
and CLP.
Remove the CLP cleaner with dry
rags, then lubricate the breech with a
light coat of CLP.
|
c.
All other parts.
Use a brush and dry rags to
clean all other parts and surfaces.
Apply a light coat of CLP to
the exterior of the launcher after
cleaning.
|
d.
Safety mechanism.
Clean the safety mechanism
properly with CLP.
Lubricate the safety with CLP.
|
|
Note. For
cleaning the rifle portion of the
launcher, refer to Task 071-311-2025.
|
|
4. Inspect the M203 before assembly.
|
a.
Check handguard for cracks,
dents, or distortion that prevent its
firm attachment to the rifle.
|
b.
Check leaf sight for bent
or damaged parts and for rust or
corrosion.
|
c.
Check leaf sight for
legibility of marking.
|
d.
Check barrel for cracks and
general condition.
Inspect all parts for wear and
damage.
|
e.
Check for burrs, scratches,
nicks, or other damage.
|
|
5. Assemble the M203.
|
a.
Press the barrel stop.
Slide the barrel into the
receiver (figure 071-311-2125-7).
|
|

Figure 071-311-2125-7.
Installing the M203 barrel
|
b.
Move the barrel rearward to
lock (figure 071-311-2125-8).
|
|

Figure 071-311-2125-8.
Locking the M203
barrel
|
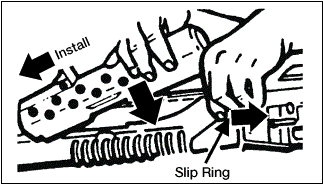
c.
Install the handguard and
secure with the slip ring (figure 071-311-2125-9).
|
|

Figure 071-311-2125-9.
Installing the handguard
|
|
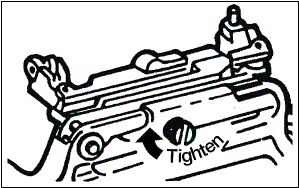
d.
Install the quadrant sight
(figure 071-311-2125-10).
|
|

Figure 071-311-2125-10.
Installing the quadrant sight
|
|
6. Perform a function check on the M203.
|
a.
Check the proper operation
of the sears.
Cock the launcher and pull the
trigger.
The firing pin should release.
Hold the trigger to the rear
and cock the launcher.
Release the trigger, then pull.
The firing pin should release.
|
b.
Check the safety in both
SAFE and FIRE positions with trigger.
Launcher must be cocked before
safety can be placed in SAFE position.
|
c.
Check the leaf sight
windage adjustment screw for proper
operation.
Do not move the elevation
adjustment screw if the weapon has
been zeroed.
|
d.
Move barrel forward and
back to be sure the stop and barrel
latch function.
|
|
Performance
Measures
|
GO
|
NO GO
|
|
1. Cleared the M203 grenade launcher.
|
—
|
—
|
|
2. Disassembled the M203.
|
—
|
—
|
a.
Removed the quadrant sight.
|
|
|
b.
Pulled back the slip ring.
|
|
|
c.
Moved the barrel forward to
the barrel stop.
|
|
|
d.
Removed the barrel.
|
|
|
|
3. Cleaned and lubricated the M203.
|
—
|
—
|
a.
Cleaned the bore.
|
|
|
b.
Cleaned the breech insert.
|
|
|
c.
Cleaned all other parts.
|
|
|
d.
Cleaned the safety
mechanism.
|
|
|
|
4. Inspected the M203 before assembly.
|
—
|
—
|
a.
Checked the handguard.
|
|
|
b.
Checked the leaf sight.
|
|
|
c.
Checked the barrel.
|
|
|
d.
Checked for burrs,
scratches, and other damage.
|
|
|
|
5. Assembled the M203.
|
—
|
—
|
a.
Slid the barrel into the
receiver.
|
|
|
b.
Closed the barrel.
|
|
|
c.
Installed the handguard.
|
|
|
d.
Installed the quadrant
sight.
|
|
|
|
6. Performed a function check on the M203.
|
—
|
—
|
a.
Checked operation of the
sears.
|
|
|
b.
Checked safety in both the
SAFE and the FIRE positions.
|
|
|
c.
Checked the leaf sight
windage adjustment screws for proper
operation.
|
|
|
d.
Checked the barrel latch
and the stop function.
|
|
|