Standards: Unloaded the MK19 machine gun, removed ammunition and empty casings. Cleared the weapon, made sure the chamber was empty and the safety switch was in the safe (S) position.
|
Conditions: Given an MK19 machine gun mounted on an M3 tripod or
vehicle loaded with linked 40-mm grenade
ammunition.
Standards:
Unloaded the MK19 machine gun, removed
ammunition and empty casings.
Cleared the weapon, made sure the
chamber was empty and the safety switch was
in the safe (S) position.
|
Performance Steps
|
|
1.
Place the safety switch on the
safe (S) position.
|
|
2.
Charge the weapon.
|
|
3.
Return the charger handles to
the forward position and rotate only
one charger handle up.
|
|
4.
Remove the live round or spent
case from bolt.
|
a. Insert the tip of a cleaning rod through the right hand rail as
close to the bolt face as possible
(figure 071-030-0006-1).
|
b. Lift up on the cleaning rod to force the live round or case off the
bolt face and out the bottom of the
gun.
Catch the live round or the
spent case as it falls out.
|
|
|
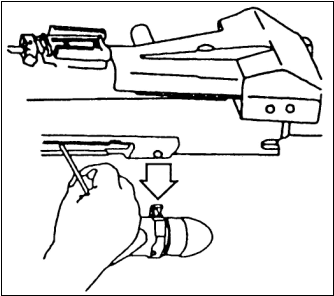
Figure 071-030-0006-1.
Removal of Round or Spent Case
|
|
|
5.
Remove linked rounds from the
feeder.
|
|
|
a. Open the top cover. Check
for rounds in the feeder.
If you find any rounds in the
feeder, perform the following actions
(figure 071-030-0006-2).
|
|
|
(1) With one hand, reach beneath the feeder.
Press the primary and secondary
positioning pawls at the same time.
|
|
|
(2) At the same time, slide the linked rounds out of the feeder
and feed throat.
|
|
|
b.
Place linked rounds in the
ammunition can.
|
|
|
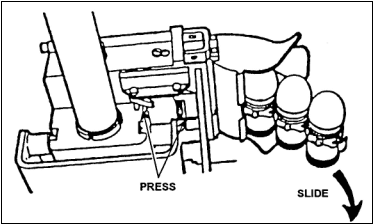
Figure 071-030-0006-2.
Removal of Linked Rounds from the
Feeder
|
|
|
6.
Place the safety switch in the
fire (F) position.
|
|
|
7.
Ride the bolt forward.
|
|
|
a. Hold one charger handle to the rear.
|
|
|
b. Press the trigger to release the bolt; ride the bolt forward.
|
|
|
c. Make sure both charging handles are forward and in the
up position.
|
|
|
8.
Place the safety switch in the
safe (S) position.
|
|
|
9.
Index the feed slide assembly
to the left.
|
|
|
10.
Close and latch the top cover.
|
|
|
|
|
Evaluation
Preparation:
Setup:
Provide the soldier with the
equipment listed in the task conditions .
Brief
Soldier:
Tell the soldier to load the MK19
according to the task steps.
|
Performance
Measures
|
GO
|
NO
GO
|
|
1. Placed the safety switch on safe (S) position.
|
—
|
—
|
|
2. Charged the weapon.
|
—
|
—
|
|
3.
Returned the charger handles to
the forward position, and rotated only
one charger handle up.
|
—
|
—
|
|
4. Removed the live round or spent case from bolt.
|
—
|
—
|
|
a. Inserted the tip of a cleaning rod through the right-hand rail as
close to the bolt face as possible.
|
|
|
|
b. Raised up on the cleaning rod to force the live round or case off
the bolt face and out the bottom of
the gun.
Caught the live round or the
spent case as it fell out.
|
|
|
|
5. Removed any linked rounds from the feeder.
|
—
|
—
|
|
a. Opened the top cover. Checked
for rounds in the feeder.
If there were rounds in the
feeder, performed the following
actions:
|
|
|
|
(1) With one hand, reached beneath the feeder, and pressed the
primary and secondary positioning
pawls at the same time.
|
|
|
|
(2) At the same time, slid the linked rounds out of the feeder
and feed throat.
|
|
|
|
b. Placed linked rounds in the ammunition can.
|
|
|
|
6. Placed the safety switch on fire (F) position.
|
—
|
—
|
|
7. Rode the bolt forward.
|
—
|
—
|
|
a. Held one charger handle to the rear.
|
|
|
|
b. Pressed the trigger to release the bolt, and ride the bolt forward.
|
|
|
|
c. Made sure both charging handles were forward and in the up
position.
|
|
|
|
8.
Placed the safety switch in
the safe (S) position.
|
—
|
—
|
|
9.
Indexed
the feed slide assembly to the left.
|
—
|
—
|
|
10.
Closed and latched the top
cover.
|
—
|
—
|
Evaluation
Guidance:
Score the soldier GO if all
performance measures are passed.
Score the soldier NO GO if any
performance measure is failed.
If the soldier scores NO GO, show him
what was done wrong and how to do it
correctly.
|
References
|
|
|
Required
|
Related
|
|
|
|
FM
23-27
|
|
|
|
TM
9-1010-230-10
|
|
|
|
|
|
|
|
|
|
|
|
|
|