Four Fundamentals of M203 Marksmanship
| The four fundamentals of M203 marksmanship are steady position, aiming, breathing, and trigger control. When the soldier changes his position, only the first fundamental (steady position) varies. The other three remain the same.
a. Steady Position. This varies according to the position.
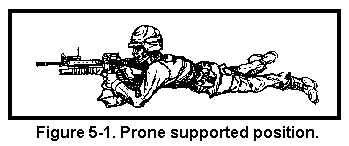
(1) Prone position. If you fire prone, try to use a prone supported position (Figure 5-1).
(a) Lie face down, grasp the M16 pistol grip with your right hand and place the butt of the rifle into the pocket of your right shoulder. (b) Lower your right elbow to the ground so your shoulders are level. This places the weight of your body behind the weapon, which enables you to recover quickly each time you fire. (c) Grasp the rifle magazine with your left hand. Straighten your upper body, and spread your legs a comfortable distance apart. Try to point your toes outward and relax your ankles, so your heels will rest on the ground. Relax the weight of your upper body forward onto your left arm. (d) For ranges greater than 150 meters, lower the buttstock of the weapon to obtain the proper sight alignment and sight picture. Grip firmly to prevent this from moving the weapon from your shoulder pocket.
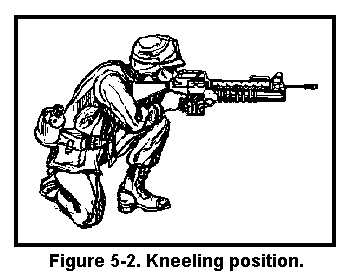
(2) Kneeling position. Figure 5-2 shows the kneeling position.
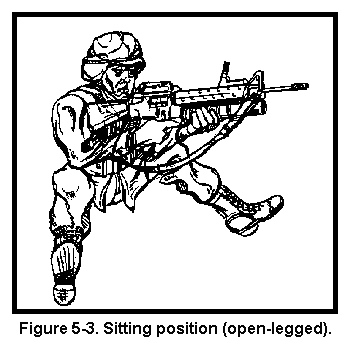
(a) Kneel on your right knee while facing the target, with your left hand on the magazine and your right grasping the rifle’ s pistol grip. (b) Place your left foot about .45 meter (18 inches) to your left front, with your toes pointing in the general direction of the target. (c) Keeping your right toe in place, sit on your right heel. (d) Place your left elbow forward of your left knee, resting the flat portion of your upper arm on your knee. (e) Move the rifle butt into the pocket of your right shoulder, pulling the rifle pistol grip with your right hand. (f) With your left hand on the rifle magazine, place your left forefinger in the trigger guard of the grenade launcher. (g) Pull the rifle firmly into your shoulder. (h) Pull your right elbow in close to your body to help you apply rearward pressure to the weapon. Ensure that your leg completes a solid, three-point base for your position. For ranges greater than 150 meters, lower the buttstock of the weapon to obtain the proper sight alignment and sight picture. Grip firmly to prevent this from moving the weapon from your shoulder pocket. (3) Sitting position, open-legged. Figure 5-3 shows the open-legged sitting position. To assume this position–
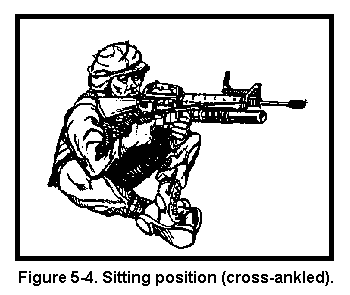
(a) Sit down, breaking your fall with your right hand, and slide your buttocks well to the rear. Face the target half right, and spread your feet wide. (b) Grasp the rifle magazine with your left hand and the pistol grip with your right hand. (c) Bend forward from your hips, and rest your left upper arm against the inside of your left knee. (d) Move the butt of the rifle into the pocket of your right shoulder, still holding the rifle pistol grip with your right hand. (e) Rest your right elbow on the inside of your right knee. (f) Pull the weapon down slightly with your left hand, and pull it to the rear firmly with your right hand. (g) For ranges greater than 150 meters, lower the buttstock of the weapon to obtain the proper sight alignment and sight picture. Grip firmly to prevent this from moving the weapon from your shoulder pocket. (4) Sitting position, cross-ankled. Figure 5-4 shows the cross-ankled sitting position. To assume this position–
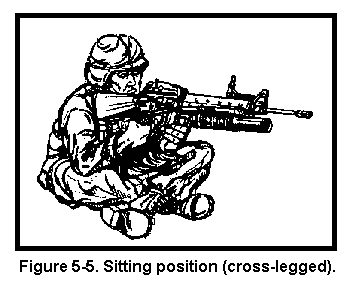
(a) Sit facing the target half right. (b) Extend your legs from your body, and cross your left ankle over your right ankle. (c) Keep both ankles straight. (d) Grasp the rifle magazine with your left hand and the rifle pistol grip with your right. (e) Place your left upper arm across your left knee. (f) Move the butt of the rifle into the pocket of your right shoulder. (g) Lower your right elbow so that your upper right arm is in contact with your right knee. (h) For ranges greater than 150 meters, lower the buttstock of the weapon to obtain the proper sight alignment and sight picture. Grip firmly to prevent this from moving the weapon from your shoulder pocket. (5) Sitting position, cross-legged. Figure 5-5 shows the cross-legged sitting position. To assume this position–
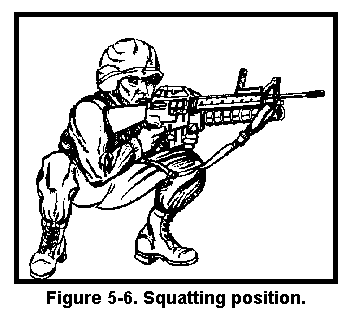
(a) Sit down facing the target half right. (b) Cross your left leg over your right leg, and draw both feet close to your body. (c) Grasp the rifle magazine with your left hand. (d) Place your left upper arm against your left knee. (e) Move the butt of the stock into the pocket of your right shoulder, and grasp the rifle pistol grip properly. (f) Lower your right elbow so that your right upper arm is against your right knee. (g) For ranges greater than 150 meters, lower the buttstock of the weapon to obtain the proper sight alignment and sight picture. Grip firmly to prevent this from moving the weapon from your shoulder pocket. (6) Squatting position. Figure 5-6 shows the squatting position.
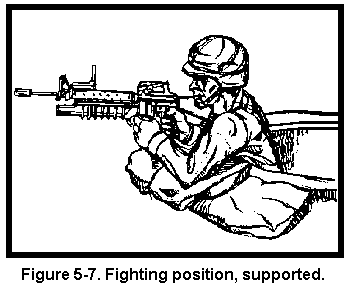
(a) Turn half right to the target, and with your feet a comfortable distance apart, squat as low as you can, keeping both feet flat on the ground. (b) Grasp the rifle magazine with your left hand. (c) Place your left upper arm inside your left knee and the butt of the stock into the pocket of your right shoulder, then grasp the rifle pistol grip properly. (d) Lower your right elbow against the inside of your right knee. (e) For ranges greater than 150 meters, lower the buttstock of the weapon to achieve proper sight alignment and sight picture. Grip firmly to prevent this from moving the weapon from your shoulder pocket. (7) Fighting position. If you fire from a fighting position, try to use support (Figure 5-7).
(a) Place your right foot against the rear of the fighting position, then lean forward until your chest is against its forward edge. (b) Grasp the magazine with your left hand. (c) Place your left elbow on or against solid support. (d) Use your right hand to position the butt of the stock in the pocket of your right shoulder, then grasp the rifle pistol grip properly. (e) Place your right elbow on or against a solid support, and relax into a comfortable firing position. (f) For ranges greater than 150 meters, lower the buttstock of the weapon to achieve proper sight alignment and sight picture. Grip firmly to prevent this from moving the weapon from your shoulder pocket. NOTE:
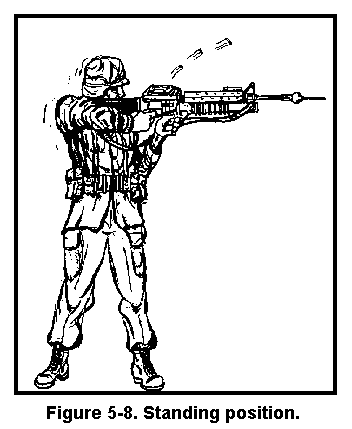
(8) Standing position. Figure 5-8 shows the standing position.
(a) Face the target standing, and spread your feet a comfortable distance apart. (b) Grasp the rifle pistol grip with your right hand and the rifle magazine with your left hand. Then place the butt of the stock into your right shoulder so that the sight is level with your eyes. (c) Hold your right elbow high to form a good pocket for the butt of the stock and to permit a strong rearward pressure with your right hand. (d) Hold most of the weight of the weapon with your left hand. (e) Shift your feet until you achieve a natural aiming stance. (f) For ranges greater than 150 meters, lower the buttstock of the weapon to obtain the proper sight alignment and sight picture. Grip firmly to prevent this from moving the weapon from your shoulder pocket. b. Aiming. Aiming procedures for every position are as follows:
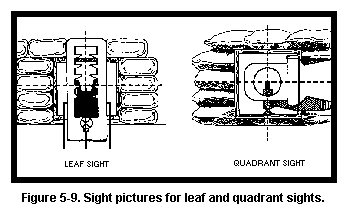
(1) Aligning sight. When using the leaf sight, align it with the front sight post of the M16. When using the quadrant sight, align its rear sight aperture with its front sight post. Picture a horizontal line through the center of the leaf sight or rear sight aperture. The top of the M16’s front sight post should touch this line. Picture a vertical line through the center of the leaf sight or rear sight aperture. This line should vertically dissect the front sight post (Figure 5-9).
(2) Focusing. For either sight, focus on the front sight post; a good firing position places your eye directly on line with the center of the leaf sight or rear sight aperture. Your eye’s natural ability to center objects in a circle and seek the point of greatest light will help you align the sight correctly. (3) Obtaining sight picture. To achieve a correct sight picture, align the front sight post and leaf sight or rear sight aperture with the target. For area targets, aim where the round’s bursting radius will make the round most effective. For point targets, aim at the target’s center of mass. c. Breathing. The technique for breathing is the same for every position: Breathe naturally. Exhale most of your air, hold your breath, and fire before you become uncomfortable. In combat, just choke off your breath before firing. d. Trigger Control. The technique for trigger control is the same for every position. Place your trigger finger (the index finger of your left hand), between the first joint and the tip of your finger (not at the extreme end of your finger) on the trigger. Adjust for your hand size and grip. Then, squeeze your trigger finger to the rear without disturbing the lay of the weapon. |
