The Stretch Drill (SD)
APPENDIX C
THE STRETCH DRILL
The Stretch Drill
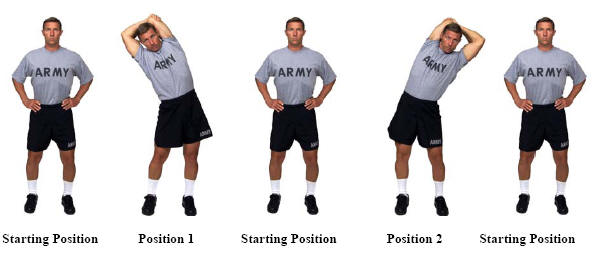
Exercise 1: The Overhead Arm Pull
Purpose: This exercise develops flexibility of the arms, shoulders, and trunk muscles.
Starting Position: Straddle stance with hands on hips.
-
On the command, “Ready, STRETCH”, raise the left arm overhead and place the left hand behind the head. Grasp above the left elbow with the right hand and pull to the right, leaning the body to the right. Hold this position for 20-30 seconds.
-
On the command, “Starting Position, MOVE”, assume the starting position.
-
On the command, “Change Position, Ready, STRETCH”, raise the right arm overhead and place the right hand behind the head. Grasp above the right elbow with the left hand and pull to the left, leaning the body to the left. Hold this position for 20-30 seconds.
-
On the command, “Starting Position, MOVE”, return to the starting position.
Check Points:
-
Throughout the exercise, keep the hips set and the abdominals tight.
-
In positions 1 and 2, lean the body straight to the side, not to the front or back.
Precautions: N/A.
The Stretch Drill
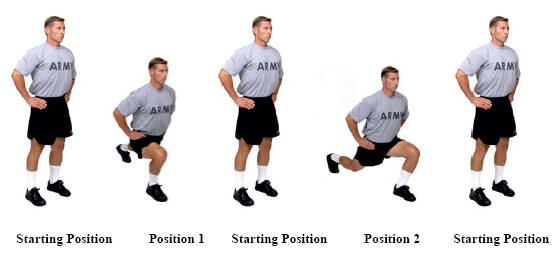
Exercise 2: The Rear Lunge
Purpose: This exercise develops flexibility of the hip flexors and trunk muscles.
Starting Position: Straddle stance, hands on hips.
-
On the command, “Ready, STRETCH”, take an exaggerated step backward with the left leg, touching down with the ball of the foot. This is the same position as count 1 of The Rear Lunge in Conditioning Drill 1. Hold this position for 20-30 seconds.
-
On the command, “Starting Position, MOVE”, assume the starting position.
-
On the command, “Change Position, Ready, STRETCH”, take an exaggerated step backward with the right leg, touching down with the ball of the foot. This is the same position as count 3 of The Rear Lunge in Conditioning Drill 1. Hold this position for 20-30 seconds.
-
On the command, “Starting Position, MOVE”, return to the starting position.
Check Points:
-
Maintain straightness of the back by keeping the abdominal muscles tight throughout the motion.
-
After the foot touches down on positions 1and 2, allow the body to continue to lower.
-
Lunge and step in a straight line, keeping the feet directed forward. Viewed from the front, the feet are shoulder width apart, both at the starting position, and at the end of positions 1and 2.
-
Keep the forward knee over the ball of the foot on positions 1and 2.
Precaution: When lunging to the left or right do not let the knee move forward of the toes.
The Stretch Drill
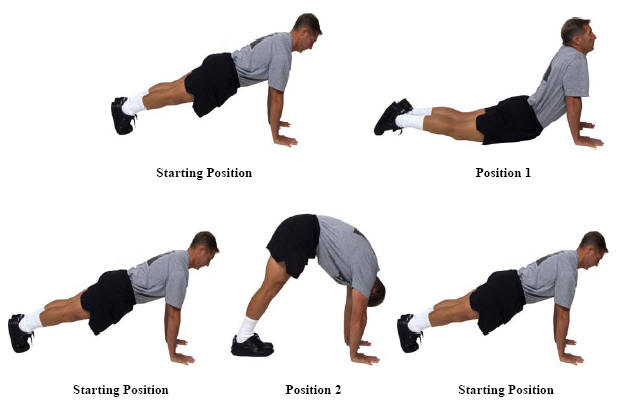
Exercise 3: The Extend and Flex
Purpose: This exercise develops flexibility of the hip flexors, abdominals, hip (Position 1 – extend) and the low back, hamstrings and calves (Position 2 -flex).
Starting Position: The front leaning rest position.
-
On the command, “Ready, STRETCH”, lower the body, sagging in the middle, keeping the arms straight and look upward. Hold this position for 20-30 seconds.
-
On the command, “Starting Position, MOVE”, assume the starting position.
-
On the command, “Change Position, Ready, STRETCH”, slightly bend the knees and walk the hands back toward the legs. Straighten the legs and try to tough the ground with the heels. Keep the feet together and hold this position for 20-30 seconds.
-
On the command, “Starting Position, MOVE”, return to the starting position.
Check Points:
-
In position 1, the thighs and pelvis rest on the ground. Relax the back muscles while bearing the bodyweight through the straight arms. Toes point to the rear.
-
In position 2, the legs are straight and the arms are shoulder width apart, palms down on the ground.
-
Feet are together throughout the exercise.
Precaution: N/A.
The Stretch Drill
Exercise 4: The Thigh Stretch
Purpose: This exercise develops flexibility of the front of the thigh and the hip flexor muscles.
Starting Position: Seated position, arms at sides and palms on the floor.
-
On the command, “Ready, STRETCH”, roll onto the right side and place the right forearm on the ground, perpendicular to the chest. The right hand makes a fist on the ground with the thumb side up. Grasp the left ankle with the left hand and pull the left heel toward the buttocks and pull the entire leg rearward. Push the left thigh further to the rear with the bottom of the right foot. Hold this position for 20-30 seconds.
-
On the command, “Starting Position, MOVE”, assume the starting position.
-
On the command, “Change Position, Ready, STRETCH”, lay on the left side and place the left forearm on the ground, perpendicular to the chest. The left hand makes a fist on the ground with the thumb side up. Grasp the right ankle with the right hand and pull the right heel toward the buttocks and pull the entire leg rearward. Push the right thigh further to the rear with the bottom of the left foot. Hold this position for 20-30 seconds.
-
On the command, “Starting Position, MOVE”, return to the starting position.
Check Points:
-
Keep the abdominal muscles tight throughout this stretch in order to keep the trunk straight.
-
Do not pull the heel forcefully to the buttock if there is discomfort in the knee joint.
Precaution: N/A.
The Stretch Drill
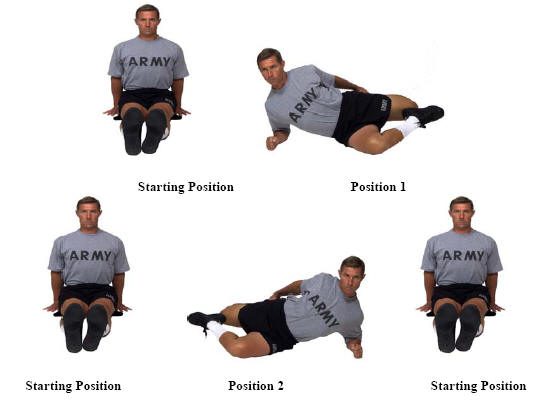
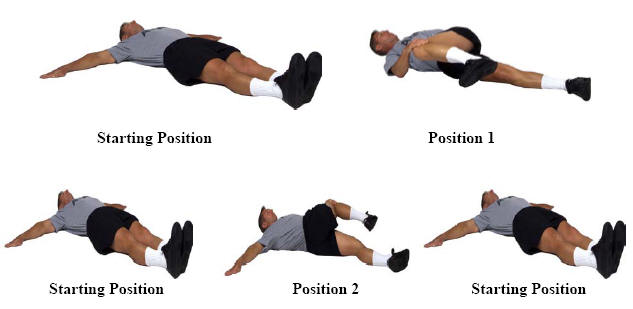
Exercise 5: The Single-leg Over
Purpose: This exercise develops flexibility of the hips and lower back muscles.
Starting Position: Supine position with arms sideward, palms down.
-
On the command, “Ready, STRETCH”, turn the body to the right, bend the left knee to 90-degrees Over the right leg, and grasp the outside of the left knee with the right hand and pull toward the right. Hold this position for 20-30 seconds.
-
On the command, “Starting Position, MOVE”, assume the starting position.
-
On the command, “Change Position, Ready, STRETCH”, turn the body to the left, bend the right knee to 90-degrees over the left leg, and grasp the outside of the right knee with the left hand and pull toward the left. Hold this position for 20-30 seconds.
-
On the command, “Starting Position, MOVE”, return to the starting position.
Check Points:
-
At the starting position, the arms are directed to the sides at 90-degrees to the trunk, the fingers and thumbs are extended and joined.
-
In position 1, keep the left shoulder, arm, and hand on the ground.
-
In position 2, keep the right shoulder, arm, and hand on the ground.
Precaution: N/A.