Cleaning lubrication and preventive maintenance for the M240B
The M240B machine gun should be cleaned
immediately after firing. At a minimum, the M240B should be cleaned after firing
a basic load of 900 to 1,200 rounds. The gunner disassembles the M240B into its
major groups for cleaning. All metal components and surfaces that have been
exposed to powder fouling should be cleaned using CLP on a bore-cleaning patch.
CLP is used on the bristles of the receiver brush to clean the receiver. After
the M240B is cleaned and wiped dry, a thin coat of CLP is rubbed on using a
cloth. This lubricates and preserves the exposed metal parts during all normal
temperature ranges.
CAUTION: When using CLP, do not use other
cleaners. Never mix CLP with RBC or LSA. When cleaning the barrel, avoid getting
CLP or RBC in the gas regulator. Damage could occur to the weapon.
- When cleaning the weapon, any of the
previously mentioned cleaning lubricating agents can be used. As soon as
possible after firing the M240B, the gunner disassembles the weapon into its
eight major assemblies and cleans them as follows. Before the weapon is
disassembled, ensure it is clear:(1) Clean the bore using CLP or RBC and a
bore brush with a cleaning rod. Do not reverse direction of the bore brush
while it is in the bore.
- Run the brush through the bore several
times until most of the powder fouling and other foreign matter has been
removed.- Swab out the bore several times using a
cleaning rod and a swab wet with CLP.- Swab out the bore several times using a
cleaning rod and a dry swab.(2) Clean the chamber using CLP and a chamber
brush attached to a cleaning rod.
- Run the brush through the chamber several
times until most of the powder fouling and other foreign matter has been
removed.- Swab out the chamber several times using a
cleaning rod and a swab wet with CLP.- wab out the chamber several times using a
cleaning rod and a dry swab.(3) Clean the receiver using a receiver brush
and CLP.
- Brush the receiver until most of the
powder fouling and other foreign matter is removed.- Swab out the receiver several times using
a cleaning rod section and a swab wet with CLP.- Swab out the receiver several times using
a cleaning rod section and a dry swab.(4) Clean the gas regulator plug with special
tools (cleaning reamers and combination regulator scraper). Remove all carbon
dust. Do not use CLP on the collar, gas block, or body.
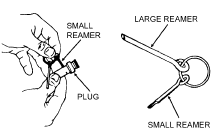
- Clean each gas inlet hole of the gas
regulator plug. Insert the small reamer into each hole and twist back and
forth to remove the carbon (apply hand pressure only).- Clean the central hole of the gas plug by
inserting the scraper tool down to the bottom of the hole and twisting
firmly.- Clean the two grooves by inserting the
scraper tool into the grooves and applying pressure as firmly as possible.
Tools for cleaning the gas
regulator plug inlet holes
Cleaning the gas regulator
plug grooves(5) Clean the gas cylinder with the special
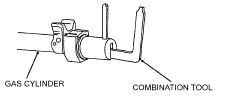
tool scraper-extraction combination tool.
- Clean the front interior of the gas
cylinder by carefully inserting the combination tool, with the handle
upward. Be sure the tool is fully inserted and seated against the gas
cylinder. Apply slight pressure to the handles and turn clockwise to remove
carbon.- Clean gas cylinder bore with gas cylinder
cleaning brush dampened with CLP.- Brush the gas cylinder until most of the
powder fouling and other foreign matter are removed.CAUTION: When inserting the
scraper-extractor combination tool into the gas cylinder, ensure before
scraping that it is fully seated against the fore-end face of the cylinder.
Damage to the fore-end of the gas cylinder could cause gas leakage and
subsequent weapon stoppage.
Cleaning tool for the gas
cylinder(6) Clean the bolt and operating rod with the
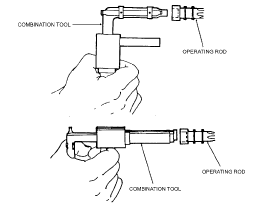
special scraper-extraction combination tool.
- Clean the piston head cavity by inserting
the combination tool into the piston bottom of the operating rod. Squeeze
handles firmly and twist the tool to remove carbon.- Insert the screwdriver end of the tool
into the piston to remove carbon residue on the bottom.- Clean the bolt and operating rod with rag
and CLP.
Cleaning tool for the
piston head cavity(7) Remember the following important points
during cleaning:
- Do not use gasoline, kerosene, benzene,
shaving cream, high-pressure water, steam, or air for cleaning.- Keep the gas hole bushing free of CLP or
RBC. It must remain dry.- During sustained firing, especially when
using blank ammunition, the extractor assembly must be stripped and cleaned
periodically.- Improper cleaning of the gas cylinder and
gas regulator plug will result in the two temporarily welding themselves
together during firing.(8) Lubricate the following parts with CLP as
instructed:
- Driving spring rod assembly.
- Bolt.
- Receiver inner walls.
- Cover assembly (springs, and feed pawls).
- Trigger housing (inside only).
- After lubricating, the components are cycled
by hand to spread the CLP. Weapons fired infrequently or stored for prolonged
periods should have a light film of CLP. This should be applied to the
interior of the gas cylinder and the gas piston immediately after cleaning or
after inspection. Preventive maintenance is performed every 90 days, unless
inspection reveals more frequent servicing is necessary. The use of the
lubricant does not eliminate the requirement for cleaning and inspecting to
ensure that corrosion has not formed. Before the weapon is used, the gas
system and components must be cleaned and free of oil and lubricants. - All exposed surfaces of the M122A1 tripod,
flex-mount assembly, complete pintle and T&E mechanism are cleaned by wiping
them down with a clean rag. For T&E and pintles that have stubborn areas with
hard-to-remove dirt, a steel brush or bore brush is used to loosen the dirt
(do not use on the flex-mount itself). A clean rag is then used to wipe them
down and CLP is used to lubricate them. - The following procedures apply to cleaning
and lubricating the M240B during unusual conditions:- Below 0 degrees Fahrenheit-use lubricating
oil, arctic weather (LAW). Oil lightly to avoid freeze-up. - Extreme heat-use light coat of CLP.
- Damp or salty air-use CLP. Clean and apply
frequently. - Sandy or dusty areas-use CLP. Clean and
apply frequently. Wipe with rag after each application to remove excess.
- Below 0 degrees Fahrenheit-use lubricating