|
Performance Steps
|
|
1. Grip the riot baton.
|
a.
Put the thong over the
right thumb as shown in Figure 191-376-4121-1
and bring it around so the thong wraps
over the back of the hand as shown in
Figure 191-376-4121-2.
This is called the baton thong
position.
|
|
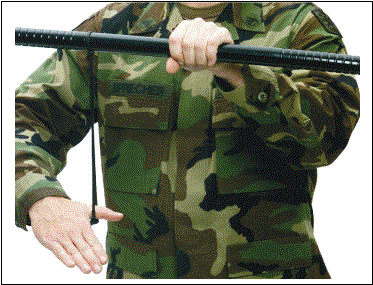
Figure 191-376-4121-1.
Baton thong position, Graphic 1
|
|
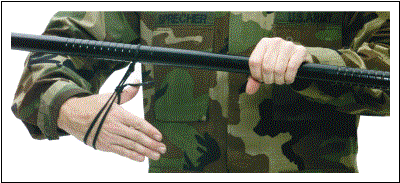
Figure 191-376-4121-2.
Baton thong position, Graphic 2
|
b.
Rotate your right hand over
and onto the baton handle and grasp it
about six inches from the end.
The thong will be pressed
against the back of the hand as shown
in Figure 191-376-4121-3.
This is called the right-hand
grip.
|
|
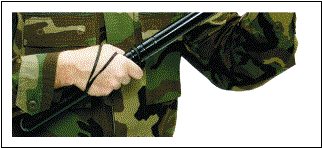
Figure 191-376-4121-3.
Right-Hand Grip
|
|
Note. This gives
you a secure grip and allows for a
quick release of the weapon when the
hand is relaxed.
|
|
2. Assume the parade rest position.
|
a.
Place your feet a
comfortable distance (about shoulder
width) apart.
|
b.
Grip the baton in the right
hand and allow your right arm to hang
naturally.
|
c.
Hold the baton horizontally
across your body.
|
d.
Grasp the baton with your
left hand, palm facing out and away
from the body and about six inches
from the end of the baton as shown in
Figure 191-376-4121-4.
|
|
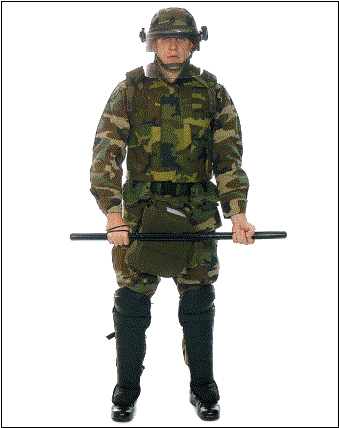
Figure 191-376-4121-4.
Parade rest position
|
|
3. Assume the port position.
This is a ready position for
individual defensive tactics.
|
|
Note. Assemble
and move to all formations in the port
position.
|
a.
Lift the left end of the
baton up by bending your left elbow
while in the parade rest position.
Your left hand should be level
with your left shoulder.
|
b.
Ensure that the striking
end of the baton bisects the angle
between the neck and the left
shoulder.
|
c.
Hold the baton about 8
inches from the body as shown in
Figure 191-376-4121-5.
This is the port position.
|
|
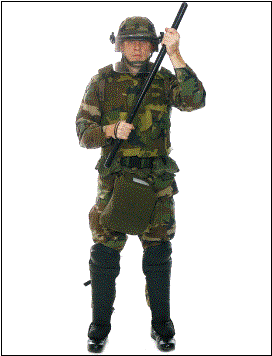
Figure 191-376-4121-5.
Port position
|
|
4. Assume the on-guard position.
|
|
Note. This is a
ready position used in making initial
contact with rioters. Do not hold it
for long periods because it is tiring
to the body. Protective movements are
normally executed from this position.
|
a.
Stand with your feet apart,
left foot forward. Bend your knees
slightly and lean forward.
|
b.
Hold the baton against your
hip with your right hand.
|
c.
Hold your left forearm
horizontally across your body with
your palm up and at a level that will
protect your throat area.
|
d.
With your left hand, grasp
the baton about 6 inches from the end.
Figure 191-376-4121-6
and figure 191-376-4121-7
show the guard position from the front
and side.
|
|
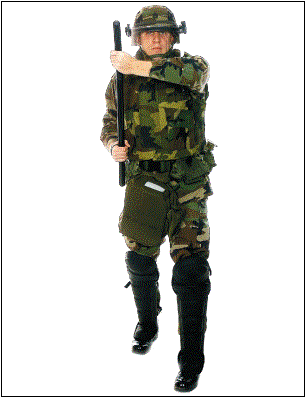
Figure 191-376-4121-6.
On-guard position (front view)
|
|
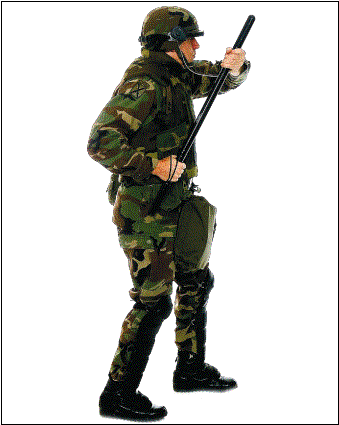
Figure 191-376-4121-7
On-guard position (side view)
|
|
5. Ensure that a blow is not directed to one of the
five fatal points.
Refer to Figure 191-376-4121-8.
|
|

Figure 191-376-4121-8
Five fatal points of impact
|
|
WARNING:
Never direct
a blow to any of the five fatal
points of impact on the human body.
These are the head, the side
of the neck or throat, the chest
cavity (heart area), and the armpit.
Deliver blows only to
vulnerable parts of your opponent’s
body, such as the shoulder.
|
|
6. Perform the short-thrust offensive technique from
the on-guard position.
|
a.
Take one rapid step forward
with the left foot.
|
b.
Snap your left arm straight
and push your right hand to drive the
striking end of the baton into a
vulnerable point on the opponent’s
body.
|
c.
Return to the on-guard
position.
|
|
7. Perform the long-thrust offensive technique from
the on-guard position.
|
a.
Hold the baton in your
right hand, take one rapid step
forward with your right foot, and
simultaneously release the left-hand
grip.
|
b.
Snap the baton forward by
rapidly extending your right arm,
driving the striking end of the weapon
into a vulnerable point of the
opponent’s body.
|
c.
Return to the on-guard
position.
|
|
8. Perform the butt-stroke offensive technique from
the on-guard position.
|
a.
Raise the right hand (while
keeping the left hand level with the
left shoulder) until the baton is
almost parallel to the ground.
|
b.
Advance the body rapidly by
moving the right foot forward one
step.
|
c.
Snap the right arm straight
forward by sliding the right hand up
the baton until the thong is tight
across the back of the hand.
|
d.
Drive the butt end of the
baton to the left, striking the
opponent’s shoulder.
|
e.
Return to the on-guard
position.
|
|
9. Perform the baton smash offensive technique from
the parade rest, port, or on-guard
position.
|
a.
Hold the baton at chest
level, horizontal to the ground.
|
b.
Advance the left foot
rapidly and snap both arms straight.
|
c.
Smash the length of the
baton across the opponent’s chest.
|
d.
Return to the position.
|
|
10. Defend yourself against a blow to the head.
|
|
Note. All the defensive tactics are started from the parade
rest, port, or on-guard position.
|
a.
Assume either the parade
rest, port, or on-guard position.
|
b.
Snap your left hand to the
left side of your body and your right
hand up and to the left.
|
c.
Block an attacker’s blow
and immediately snap both arms up so
the left hand is near the left
shoulder and the right hand is in
front of the left shoulder.
|
d.
Execute a jab or smash by
stepping forward with your right foot,
driving your body forward.
Jab the thong end of the baton
into the attacker’s upper body.
|
e.
Return to the original
starting position.
|
|
11. Defend yourself against a backhand blow.
|
a.
Assume either the parade
rest, port, or on-guard position.
|
b.
Snap both arms out and to
your right or left front, depending on
the direction of the oncoming blow.
|
c.
Raise your left hand above
your head so the grip end of the baton
is pointing down.
|
d.
Block the attacker’s blow.
|
e.
After blocking the blow,
bring the right hand up near the right
shoulder.
|
f.
Move the left hand down,
parallel to the chest area, in
preparation for a butt stroke. (Refer
to step 8).
|
|
12. Defend yourself against a long thrust.
|
a.
Assume the parade rest,
port, or on-guard position.
|
b.
Move your left hand across
the body toward the left.
|
c.
Move your right hand down
and toward the left.
|
d.
Slide your left hand down
the baton to the right hand.
Your body and baton are now in
position to defend with a counterblow.
|
|
13. Defend yourself against an overhead stab.
|
a.
Assume the parade rest,
port, or on-guard position.
|
b.
Step backward with your
left foot when the attacker stabs
downward.
|
c.
Slide your left hand down
the baton to meet the right, and raise
the baton up over your left side and
shoulder.
|
d.
Disarm the attacker by
snapping the baton down against his
wrist or forearm.
|
e.
Return your left hand and
left foot to their original position
in preparation to execute a baton
smash.
|
|
14. Defend yourself against an upward thrust.
|
a.
Assume the parade rest,
port, or on-guard position.
|
b.
Hold the baton
horizontally, about 6 inches from your
lower chest.
|
c.
Snap both arms straight
down and strike the opponent’s wrist
to cause him to drop his weapon.
|
d.
Hold the baton with both
your hands and immediately bring the
baton close to your shoulders and hold
it across your chest in preparation to
execute the baton smash.
|
|
15. Defend yourself against an unarmed attacker.
|
a.
Slide your left hand toward
your right and lift the baton to
shoulder level, parallel to the
ground.
|
b.
Move your body slightly to
the rear by withdrawing your left
foot.
|
c.
Use your baton to deliver a
counterblow to the attackers shoulder
or collarbone, if he attempts to
strike you with a blow.
|
d.
Deliver a counterblow to
the attacker’s right forearm, if he
attempts to strike you with a blow.
|
e.
Jab the attacker in the
groin or stomach with your baton, if
he attempts to grab you.
|