|
Performance Steps
|
|
1.
Inventory the M18A1
Claymore mine bandoleer, accounting
for all accessories. (figure 071-325-4425-1).
|
|

Figure 071-325-4425-1.
Components of the M18A1 Claymore mine
|
|
WARNING:
During
testing and installation, keep the
M57 firing device in your possession
to prevent accidental firing by
someone else.
|
|
2.
Conduct a circuit test at
the firing point (figure 071-325-4425-2).
|
|

Figure 071-325-4425-2.
Circuit test of the M57 firing device
and M40 test set
|
a.
Remove the electrical wire
and accessories while leaving the mine
in the bandoleer.
|
b.
Remove the dust cover from
the connector of the M57 firing device
and from the female connector of the
M40 test set.
|
c.
Plug the test set into the
firing device.
|
d.
Position the firing device
bail to the FIRE position.
|
e.
Actuate the handle of the
firing device with a firm, quick
squeeze, observing the flash of light
through the window of the test set.
|
|
Note. The flashing light indicates that the M57 firing device
and M40 test set are functioning
correctly.
|
f.
Remove the shorting plug
cover from the connector of the firing
wire and from the end of the test set.
|
g. Plug the connector of the
firing wire into the test set (figure 071-325-4425-3).
|
|

Figure 071-325-4425-3.
Circuit test of the M18A1 Claymore
mine firing system
|
|
WARNING:
The blasting
cap must be placed under a sandbag,
behind a tree or in a hole in the
ground to protect the person
performing the circuit check in case
the blasting cap detonates.
|
h.
Place the M57 firing device
bail in the FIRE position and actuate
the firing handle.
|
|
Note. The lamp in the window of the M40 test set should flash.
|
i.
Place the firing device on
SAFE, remove the M57 firing device and
M40 test set.
|
j.
Place the shorting plug
cover on the firing wire.
|
|
3. Install the M18A1 Claymore mine.
|
a. Tie the shorting plug end
of the firing wire to a fixed object,
such as a stake or tree at the firing
position (figure 071-325-4425-4).
|
|

Figure 071-325-4425-4.
Firing wire secured
|
b.
Place the bandoleer on your
shoulder.
|
c.
Unroll the firing wire to
the selected installation position.
|
|
Note. The firing wire is laid from the firing position to the
mine installation site because the
blasting cap end is on the inside of
the firing wire spool.
|
|
4. Aim the mine.
|
a.
Remove the mine from the
bandoleer.
|
b. Open both pairs of legs to
a 45-degree angle with two legs facing
to the front and two legs facing to
the rear of the mine (figure 071-325-4425-5).
|
|

Figure 071-325-4425-5.
Placing and aiming the mine
|
c.
Push the legs about
one-third of the way into the ground
with the mine facing in the desired
direction of fire. In windy areas or
when the legs cannot be pressed into
the ground, spread the legs as far as
they will go (about 180 degrees) so
the legs are to the front and rear of
the mine and the mine will not tip
over.
|
|

Figure 071-325-4425-6.
Aiming knife-edge sight
|
d.
Select an aiming point at ground level
about 50 meters (150 feet) in front of
the mine (figure 071-325-4425-6).
|
e.
Position one eye about 6
inches to the rear of the sight.
|
(1) On a knife-edge
sight, align the two edges of the
sight with the aiming point (figure 071-325-4425-7
and figure 071-325-4425-8).
|
|

Figure 071-325-4425-7.
Aiming knife-edge sight (continued)
|
|

Figure 071-325-4425-8.
Aiming knife-edge sight (continued)
|
(2)
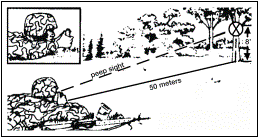
On a slit-type peep sight,
align the groove of the sight with the
aiming point that is 2.5 meters (8
feet) off the ground (figure 071-325-4425-9
and figure 071-325-4425-10).
|
|

Figure 071-325-4425-9.
Aiming slit-type peep sight
|
|

Figure 071-325-4425-10.
Aiming slit-type peep sight
(continued)
|
|
Note. The aiming point should be in the center of the desired
area of coverage with the bottom edge
of the peep sight parallel to the
ground that is to be covered with the
fragment spray.
|
|
5. Arm the mine.
|
a.
Secure the firing wire
about one meter to the rear of the
mine so the mine will not become
misaligned if the firing wire is
disturbed.
|
b.
Unscrew one of the shipping
plug priming adapters from the mine.
|
c.
Slide the slotted end of
the shipping plug priming adapter onto
the firing wire of the blasting cap
between the crimped connections and
the blasting cap.
|
d.
Pull the excess wire
through the slotted end of the adapter
until the top of the blasting cap is
firmly seated in the bottom portion of
the shipping plug priming adapter
(figure 071-325-4425-11).
|
|

Figure 071-325-4425-11.
Arming the mine
|
e.
Screw the adapter, with the
blasting cap, into the detonator well.
|
|
WARNING:
Ensure that
the face of the mine marked
"front toward enemy" and
the arrows on the mine point in the
direction of the enemy.
|
f.
Recheck the aim of the
mine.
|
|
6. Camouflage the mine.
|
|
7. Bury the firing wire (if possible) from the mine
back to the firing position.
|
|
Note. The firing position should be in a hole or covered
position at least 16 meters to the
rear or the side of the emplaced mine.
|
|
WARNING:
The M40 test
set must be used during retest of
the circuit.
|
|
8.
Repeat step 2 to test the
circuit after the firing wire is laid
out and the cap is placed inside the
mine to see if there are any breaks in
the wire (figure 071-325-4425-12).
|
|

Figure 071-325-4425-12.
Retesting the circuit
|
|
Note. To ensure that the mine will function properly after
installation, retest the firing
circuit to check for any break in the
wire that may have occurred during
installation.
Note. Friendly troops within 250 meters to the front and sides
and 100 meters to the rear of the mine
must be under cover.
|
|
WARNING:
You must be
behind cover or in a fighting
position when retesting the circuit
on a Claymore mine with the blasting
cap inserted in the detonation well.
|
|
9. Fire the mine.
|
a.
Remove the dust cover from
the firing device and firing wire.
|
b.
Connect the firing wire to
the firing device.
|
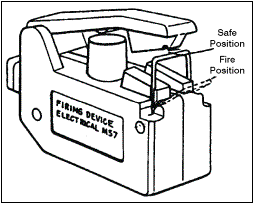
c. Position the firing device
safety bail in the FIRE position
(figure 071-325-4425‑13).
|
|

Figure 071-325-4425-13.
Firing device in the SAFE position
|
d.
Actuate the firing device
handle with a firm, quick squeeze.
|
e.
Assume a prone position
behind cover.
|
|
Note. The mine is most effective when employed against targets
20 to 30 meters in front of it.
|
|
Performance
Measures
|
GO
|
NO GO
|
|
1. Inventoried the M18A1 Claymore mine bandoleer,
and ensured all components were
present and in serviceable condition.
|
—
|
—
|
|
2. Conducted a circuit test.
|
—
|
—
|
a.
Removed the electrical wire
and accessories while leaving the mine
in the bandoleer.
|
|
|
b.
Removed the dust cover from
the connector of the M57 firing device
and from the female connector of the
M40 test set.
|
|
|
c.
Plugged the test set into
the firing device.
|
|
|
d.
Positioned the firing
device bail to the FIRE position.
|
|
|
e.
Actuated the firing handle,
and observed the flash in the test set
window.
|
|
|
f.
Removed the shorting plug
cover from the connector of the firing
wire and from the end of the test set.
|
|
|
|
Note. The soldier can place the sandbag over the blasting cap
any time before plugging the test set
into the firing wire connector.
|
|
|
g.
Plugged the test set into
the firing wire connector.
|
|
|
h.
Placed the M57 firing
device bail in the FIRE position and
actuated the firing handle.
|
|
|
i.
Placed the firing device on
SAFE, removed the M57 firing device
and M40 test set.
|
|
|
j.
Placed the shorting plug
cover on the firing wire.
|
|
|
|
3. Installed the M18A1 Claymore mine.
|
—
|
—
|
a.
Tied the shorting plug end
of the firing wire to fixed object
(stake, tree, etc.) at the firing
position.
|
|
|
b.
Placed the bandoleer on
shoulder.
|
|
|
c. Unrolled
the wire to the mine emplacement site.
|
|
|
|
4. Aimed the mine.
|
—
|
—
|
|
5. Armed the mine.
|
—
|
—
|
a.
Secured the wire at the
mine site.
|
|
|
b.
Inserted the blasting cap
in either detonator well.
|
|
|
c.
Locked the blasting cap in
place with the shipping plug priming
adapter.
|
|
|
d.
Rechecked the lay of the
mine.
|
|
|
|
Note. If the soldier tries to put the blasting cap through the
hole in the shipping plug priming
adapter, he fails performance measure
3.
|
|
|
|
6. Camouflaged the mine.
|
—
|
—
|
|
7. Buried the firing wire from the mine back to the
firing position.
|
—
|
—
|
|
8. Rechecked the circuit.
|
—
|
—
|
a.
Removed the electrical wire
and accessories while leaving the mine
in the bandoleer.
|
|
|
b.
Removed the dust cover from
the connector of the M57 firing device
and from the female connector of the
M40 test set.
|
|
|
c.
Plugged the test set into
the firing device.
|
|
|
d.
Positioned the firing
device bail to the FIRE position.
|
|
|
e.
Actuated the firing handle.
|
|
|
f.
Observed the flash through
the window on the test set.
|
|
|
g.
Placed a sandbag over the
blasting cap.
|
|
|
h.
Plugged the test set into
the firing wire connector.
|
|
|
i.
Actuated the firing handle
and observed the window in the test
set for a flash.
|
|
|
j.
Placed the firing device on
SAFE.
|
|
|
k.
Replaced the shorting plug
cover on the firing wire.
|
|
|
|
9. Fired the M18A1 Claymore mine.
|
—
|
—
|
a.
Removed the dust cover from
the firing device and firing wire.
|
|
|
b.
Connected the firing wire
to the firing device.
|
|
|
c.
Positioned the firing
device safety bail in the FIRE
position.
|
|
|
d.
Actuated the firing device
handle with a firm, quick squeeze.
|
|
|
e.
Assumed a prone position
behind cover.
|
|
|
|
Note. The soldier may assume the prone position any time
before placing the firing device on
FIRE.
|
|
|
f.
Completed steps 9a through
9e sequence.
|
|
|