|
Performance Steps
|
|
Note. Because the M136 launcher is issued as a round of
ammunition rather than as a weapon,
the launcher is completely used;
therefore, inspection is limited to
visual examination of the external
components.
|
|
1. Perform the prefire checks. The overall condition
of the launcher should be inspected
before it is used (figure 071-054-0001-1).
The firer should ensure-
|
a.
The transport safety pin is
in place and fully seated and the
lanyard is attached.
|
b.
The cocking lever is in the
SAFE position and folded down.
|
c.
The fire-through muzzle
cover is intact. If the seal is torn,
it should be removed to ensure that no
foreign objects have gotten into the
launcher.
|
d.
The launcher’s color-coded
band is the correct color: black for
high-explosive antitank, gold for
target-practice tracers, and blue for
field-handling trainers.
|
e.
The sights function
properly. Open the sight covers to
ensure the sights pop up and are not
damaged.
|
f.
The red safety catch does
not move when depressed.
|
g.
The rear seal is not
damaged.
|
h.
The shoulder stop is not
broken or damaged and it unsnaps and
folds down.
|
i.
The carrying sling is not
frayed and is attached to the
launcher.
|
j.
The launcher body has no
cracks, dents, or bulges.
|
|
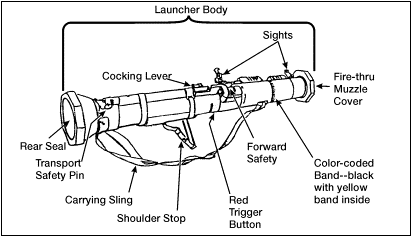
Figure 071-054-0001-1. Parts of the M136 launcher to be
inspected
|
|
2. Prepare the launcher for firing. Preparation
procedures are-
|
a.
Remove the launcher from
the carrying position and cradle it
with the left arm (figure 071-054-0001-2).
|
|
Figure 071-054-0001-2.
Cradle position
|
b.
While cradling the
launcher, pull the transport safety
pin with the right hand and release it
(figure 071-054-0001-3).
|
|
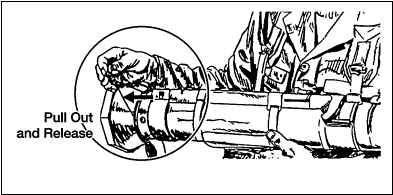
Figure 071-054-0001–
3. Removing the transport safety pin
|
|
Note. Ensure the transport safety pin is attached to the
launcher by its lanyard.
If the launcher has no lanyard, place
the transport safety pin in your
pocket.
If the launcher remains unfired,
reinsert the transport safety pin.
|
|
WARNINGS
Make sure
personnel wear earplugs.
Point the
weapon toward the target.
Clear the
back blast area.
|
c.
Unsnap and unfold the
shoulder stop (figure 071-054-0001-4).
|
|
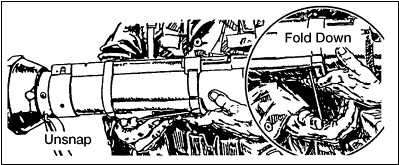
Figure 071-054-0001-4.
Unsnapping the shoulder stop
|
d.
With the shoulder stop in
position, place the launcher on the
right shoulder.
|
e.
With the launcher on the
right shoulder and supported with the
left hand, release the front sight by
pressing down on the sight cover and
sliding it to the rear. Release the
rear sight by pressing down on the
cover and sliding it forward. Sliding
the covers off allows the sights to
pop up.
|
f.
Check the backblast area.
|
g.
Cock the launcher by
unfolding the cocking lever with the
right hand. Place the thumb of the
right hand under the cocking lever.
Grip the front of the firing mechanism
for support. Push the cocking lever
forward to the right. Let the cocking
lever slide back (figure 071-054-0001-5).
|
|
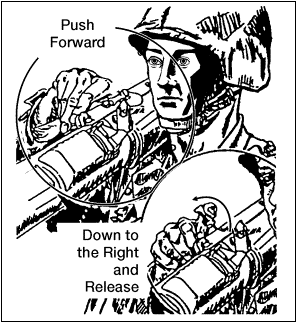
Figure 071-054-0001-5.
Cocking the launcher
|
h.
Adjust the rear sight for
the required range.
|
(1)
When closing the sight
cover, set the sight on a range of 200
meters. When the rear sight is
uncovered, the battlesight setting is
200 meters. If the range to the target
is more than 200 meters but less than
250 meters, no sight adjustment is
required (figure 071-054-0001-6).
|
|
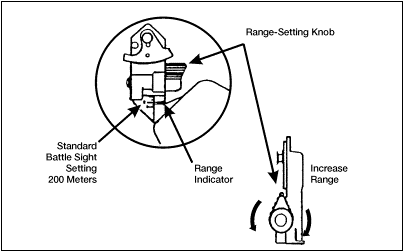
Figure 071-054-0001-6.
Adjusting the rear sight
|
(2)
To adjust the rear sight
range setting to more than 200 meters,
turn the range knob clockwise (toward
the muzzle). To decrease the range,
turn the range knob counterclockwise
(toward the gunner). There is a click
at each 50-meter increment; this sound
aids you during limited visibility
(figure 071-054-0001-6).
|
|
Performance
Measures
|
GO
|
NO GO
|
|
1. Performed the prefire checks.
|
—
|
—
|
a.
Checked the transport
safety pin.
|
|
|
b.
Ensured the cocking lever
was on SAFE.
|
|
|
c.
Checked the fire-through
muzzle cover.
|
|
|
d.
Checked the color-coded
band.
|
|
|
e.
Checked the front and rear
sights.
|
|
|
f.
Checked the red safety
catch.
|
|
|
g.
Checked the rear seal.
|
|
|
h.
Checked the shoulder stop.
|
|
|
i.
Checked the carrying sling.
|
|
|
j.
Checked the body of the
launcher.
|
|
|
|
2. Prepared the launcher for firing.
|
—
|
—
|
a.
Removed the transport
safety pin.
|
|
|
b.
Unsnapped and unfolded the
shoulder stop.
|
|
|
c.
Placed the launcher on the
right shoulder.
|
|
|
d.
Released the front and rear
sights.
|
|
|
e.
Checked the back-blast
area.
|
|
|
f.
Cocked the launcher.
|
|
|
g.
Adjusted the rear sight.
|
|
|