|
Performance Steps
|
|
1. Identify the target(s). The most likely target you
will engage is an enemy soldier on
foot.
|
|
2.
Apply the fundamentals of
quick fire.
|
|
Note. To fire quickly without using the pistol sights, use the
pistol as an extension of your arm.
|
a.
To use the pistol grip,
hold the pistol in your nonfiring
hand. Form a "V" with the
thumb and forefinger of your firing
hand.
|
b.
Place the pistol in the
"V," with the sights in line
with your firing arm.
|
c.
Hold your upper arm close
to your body, and your forearm at
about a 45-degree angle.
|
d.
Wrap your lower three
fingers around the grip, putting equal
pressure to the rear with all three
fingers (figure 071-004-0006-1).
|
e.
Place your thumb alongside
the pistol without applying any
pressure.
|
f.
Place your trigger finger
on the trigger so it can be pulled to
the rear.
|
g.
Tightly grip the pistol
until your hand begins to tremble.
Relax until the trembling stops. At
this point, you have applied the
necessary pressure for a solid grip.
|
|

Figure 071-004-0006-1.
Pistol ready position, one-hand grip
|
|
Note. If you relax any of your three fingers on the grip, you
must reapply the entire grip.
|
|
3. Choose one of the following supported or
unsupported grips:
|
a.
Supported grip. The only
supported grip is the one-hand grip
(figure 071-004-0006-2).
Begin by gripping the weapon as
previously described (step 2). Allow
the thumb of your firing hand to rest
without pressure beside your weapon.
Place your trigger finger, between the
tip and the second joint, on the
trigger, so you can squeeze the
trigger to the rear. Your trigger
finger must work independently of your
other fingers.
|
|
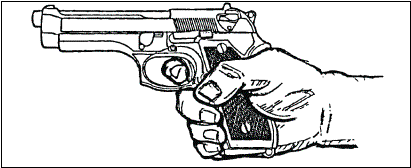
Figure 071-004-0006-2.
One-hand grip
|
b.
Unsupported grips. You may
use any of three nonfiring hand grips
to support your firing hand (figure 071-004-0006-3,
figure 071-004-0006-4,
and figure 071-004-0006-5).
|
(1)
Fist grip (figure 071-004-0006-3).
Begin by gripping the weapon as
previously described (step 2). Firmly
close the fingers of your nonfiring
hand over the fingers of your firing
hand. Make sure the index finger of
your nonfiring hand is between the
middle finger of your firing hand and
the guard. Place your nonfiring thumb
beside your firing thumb.
|
|
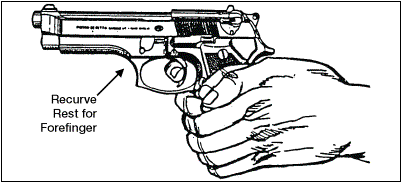
Figure 071-004-0006-3.
Fist grip
|
|
Note. The M9 pistol has a recurved trigger guard, which allows
you to place the index finger of your
nonfiring hand on the front of the
trigger guard if you wish.
|
(2)
Palm-supported grip (figure
071-004-0006-4).
Begin by gripping the weapon as
previously described (step 2). Place
your nonfiring hand under your firing
hand. Wrap your nonfiring fingers
around the back of your firing hand.
Place your nonfiring thumb over the
middle finger of your firing hand.
|
|
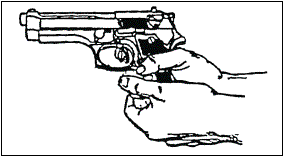
Figure 071-004-0006-4.
Palm-supported grip
|
(3)
Weaver grip (figure 071-004-0006-5).
Apply this grip the same as the fist
grip, but wrap your nonfiring thumb
over your firing thumb.
|
|
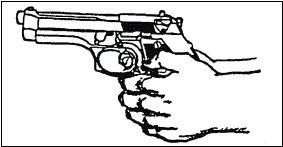
Figure 071-004-0006-5.
Weaver grip
|
|
4. Select the most stable firing position with the
best cover. Consider the following
positions:
|
a.
Prone (figure 071-004-0006-6). To
assume the prone position-
|
(1)
Lie flat on the ground,
facing the target.
|
(2)
Extend your arms to the
front, with your firing arm locked.
|
(3)
Wrap your nonfiring hand
around either the wrist or the fingers
of your firing hand.
|
(4)
Face forward. Keep your
head down between your arms and behind
the weapon.
|
|
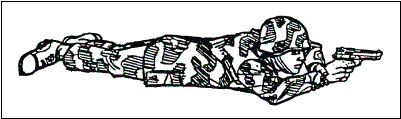
Figure 071-004-0006-6.
Prone position
|
b.
Standing-with-support
(figure 071-004-0006-7).
To assume this position–
|
(1)
Use available cover for
support. For example, stand behind a
tree or wall.
|
(2)
Stand behind a barricade,
with your firing side in line with the
edge of the barricade.
|
(3)
Place the palm of your
nonfiring hand at eye level on the
edge of the barricade, and extend your
thumb past the edge of the barricade.
|
(4)
Lock the elbow of your
firing arm. Rest your forearm on the
extended thumb of your nonfiring hand.
|
(5)
Move the foot on your
nonfiring side forward until your toe
touches the bottom of the barricade.
|
|
Figure 071-004-0006-7.
Standing-with-support position
|
c.
Kneeling (figure 071-004-0006-8). To
assume this position-
|
(1)
Use available cover, such
as a low wall, rocks, or a vehicle
that you can fire over, for support.
|
(2)
Place your firing knee on
the ground. Put your left knee down to
fire left-handed, or your right knee
down to fire right-handed.
|
(3)
Bend your other knee. Place
the foot on your nonfiring side flat
on the ground, pointing toward the
target. Extend your arms over
available cover and use it for
support.
|
(4)
Lock the wrist and elbow of
your firing arm.
|
(5)
Wrap your nonfiring hand
around your firing fist or wrist to
support your firing arm.
|
|
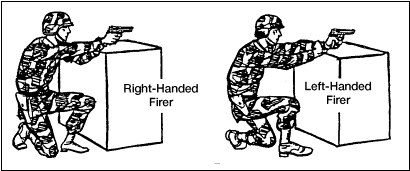
Figure 071-004-0006-8. Kneeling position
|
|
Note. This position could silhouette you, making you a better
target. When possible, fire around the
sides of walls, rocks, or vehicles
instead of over them.
|
d.
Standing-without-support
(figure 071-004-0006-9).
To assume this position-
|
(1)
Face the target.
|
(2)
Place your feet a
comfortable distance apart.
|
(3)
Wrap your nonfiring hand
around the fist or wrist of your
firing hand. Lock the wrist and elbow
of your firing arm toward the target.
|
(4)
Keep your body straight.
|
|
Figure 071-004-0006-9.
Standing-without-support position
|
e.
Crouching (figure 071-004-0006-10). This
position is the same as the
standing-without-support position,
except you must bend your knees
slightly. Balance by leaning forward
at the waist.
|
|
Figure 071-004-0006-10.
Crouching position
|
|
5. Apply the fundamentals of marksmanship.
|
a.
Pistol grip. To obtain a
proper pistol grip-
|
(1)
Place the pistol in the
"V" formed by the thumb and
forefinger of your firing hand. Line
the sights up with your firing arm.
Wrap your lower three fingers around
the pistol. Grip with your middle
finger under the trigger guard. Exert
equal pressure on all three lower
fingers to the rear, back through the
wrist and forearm (figure 071-004-0006-1).
|
(2)
Rest your thumb on top of
your middle finger when gripping the
pistol. Do not exert any downward
pressure.
|
(3)
Grip the pistol firmly, but
not so firmly that your hand trembles.
|
b.
Sight alignment. To sight
properly-
|
(1)
Align the front sight blade
in the rear sight notch so an equal
amount of light shows on either side
of the front sight. Ensure the top of
the front and rear sights are even.
|
(2)
Relax as much as possible.
|
(3)
Maintain the correct sight
alignment, and focus on the front
sight.
|
(4)
Squeeze the trigger with a
steadily increasing pressure straight
to the rear, taking care not to
disturb the sight alignment until
after the hammer falls.
|
|
Note. When there is more than one target, choose the target
that is the greatest danger. This is
often the closest target.
|