AN/PAQ-4 Zeroing Techniques
|
1. OVERVIEW. This appendix is designed to improve zeroing for the AN/PAQ-4 (A or C models). For a more complete handling of this subject, contact the 82d Airborne Division. 2. AN amplification by simulated emission of radiation) are used extensively by the U.S. Armed Forces due to their ability to allow the user to remain undetected by the naked (unaided) eye. Infrared lasers are used as aiming and pointing devices.
of IALs are battery-powered, light-emitting diode transmitters which project a narrow beam of infrared light visible only when seen with image intensification viewers, such as NVG (e.g., AN/PVS-7 series NVGs). The projected light beam allows the user to determine exact aiming points as well as assign directions of fire or movement and designate targets for others equipped with NVGs. The aiming light increases the accuracy of direct firing at night. After being properly mounted and zeroed to the weapon, and turned ON, the aiming light sends out the invisible light beam along the line of sight which allows the user to engage targets successfully. 3. AN/PAQ-4A
Characteristics. Weight: 0.9 lbs. 150 meters 2 AA batteries (BA-3058) or 1 Lithium Battery (BA-5567v/1567v)
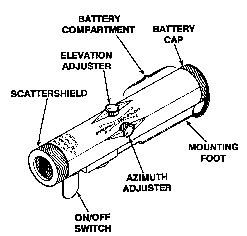
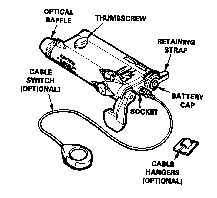
Components. Assembly (or foot) for the M16A2 (OFF/ON/Momentary ON) adjusters (azimuth and elevation): one for moving beam up/down and the other for moving the beam left/right. mounts to front of aiming light that confines the light in a narrow beam, reducing off-axis radiation. used when boresighting TM 11-5855-297-12&
Employment Considerations. The aiming light is highly accurate for short ranges (out to approximately 100m) when zeroed properly, using the ARI dry or live-fire zeroing techniques. The zeroing procedure in the technical manual (TM) does not work very well and leaves you with one aiming light not zeroed. Remember, the aiming light can be seen by anyone equipped with NVG, friendly or enemy. 4. MOUNT AND
be mounted on the following weapons/weapon systems: include with M203 grenade launcher attached) automatic rifle
operating procedures are covered in the Operator’s Manual (TM 11-5855-297-12& Section III). 5. ZERO
Procedures for Zeroing. These procedures make three critical assumptions. First that the firer has a good daytime zero with the iron sights. Second, the initial aiming light adjustments have been made so that the firer’s bullets are "on paper" at 25 meters at night. Third, the firer’s NVG are adjusted for best visual acuity. All procedures can be implemented with materials readily available within a unit.
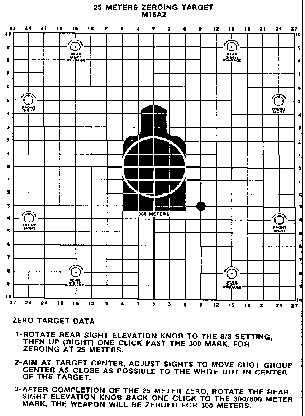
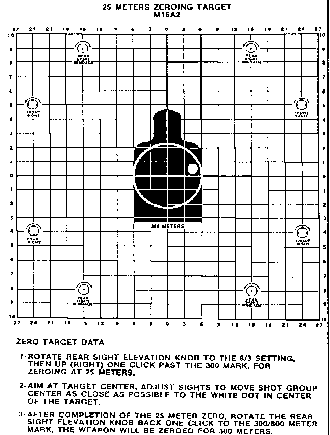
Daylight Zero of Rifles. Any rifle intended for night-time zeroing should also be properly zeroed for daytime firing. In the daylight, zero the M16A2 rifle for 300 meters using the standard 25-meter zeroing procedure (rear sight set to the 300 meter setting plus one click up toward 400 while zeroing). Use this setting for all-25 meter firing. Reference Task No. 071-311-2030 Zero an M16A2 rifle, STP 21-1-SMCT.
the AN/PAQ-4A for Night-Time Firing. This zeroing procedure involves aiming the iron sights of your daytime zeroed M16A2 rifle at the center of a specially marked zeroing target (placed eight M16A2 rifle lengths, 26 feet-4 inches, in front of the muzzle of the rifle) and then adjusting the AN/PAQ-4A aiming light beam to a designated spot that will result in a 100-meter aim light zero. The zero will make the aiming light spot parallel to the strike of the round at 100 meters. It is a nonfiring process so it can be done indoors or outdoors, from subdued light conditions to fully dark. All that is needed is about 30 feet of space.
designed AN/PAQ-4A "ARI DRY-FIRE ZERO" target on which a white dot is marked 9 mm below and 41 mm left of center mass of the target (See Figure 2). (Also see Chapter 4, Own The Night Individual Training Package, for the full-sized reproducible copy of the ARI target). This is the target to use during the zeroing process. Field expedient methods of zeroing the AN/PAQ-4A will be covered at the end of this section.
with subdued lighting that has a vertical surface (e.g., wall, tree) on which you can attach the 25-meter target. Then measure a distance of 26′ 4" (or eight M16A2 rifle lengths) from that vertical surface to the muzzle of your M16A2 rifle. Set up a supported aiming position so that you can hold the rifle very steady while carrying out the AN/PAQ-4A spot adjustment procedure. As soon as it is dim enough for your buddy to see the laser spot clearly with NVG while standing near the target, you can perform the night-time zero.
zeroing procedure will be easier if two soldiers work together. Be sure the rifle is clear and on safe. The shooter, who has daylight-zeroed his weapon, gets into a very steady supported position and lines up his iron sights at center mass on the dry-fire zeroing target. Be sure the rifle is set for 300 meter use (the 3 setting on the rear sight). The buddy will adjust the AN/PAQ-4A knobs to move the spot until it is exactly on top of the white dot at lower left of the target. If it is too dark to see through the iron sights, you can use a flashlight(s) to illuminate the target and perhaps the sights, if necessary.
the beam spot adjustment uses his NVG to see the beam spot. The buddy should try the goggles with and without the pinhole cap on to determine which gives the clearest view of the spot while standing close to the target.
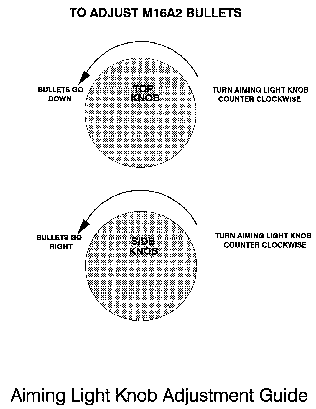
use the "screw analogy" to adjust the beam. The top knob on the AN/PAQ-4A adjusts the spot up and down. Using the screw analogy, if the top knob were a screw, turning it clockwise would cause it to screw down. Therefore, turning the knob clockwise will adjust the spot down. Likewise, turning a screw counter-clockwise would cause the screw to come up and out of the hole, so the top knob turned counter-clockwise will cause the beam spot to go up. The knob on the left side of the AN/PAQ-4A adjusts the spot left and right. If the knob were a screw, turning it clockwise would cause it to screw in (go to the right). So, turning the knob clockwise will cause the beam spot to move to the right (and counter-clockwise — to the left). If you get confused, think what a screw would do and you will know which way to turn either knob to move the spot where you want (i.e., clockwise = down or into the screw hole {down and right}; counter clockwise = up or out of the screw hole {up and left}).
beam, it works well to move back and forth to the target so you can see the beam spot location very clearly. Make the necessary adjustments while the shooter is relaxing, then have the shooter get a good center mass aim again and recheck the accuracy of the spot placement (on the white dot). This zeroing process takes only about 5 to 10 minutes.
beneficial to have a third person close to the target using goggles to check the accuracy of the aiming light beam on the dry-fire target. Then the buddy can stand next to the shooter, and simply adjust the aiming light knob in accordance with the directions given by the individual at the dry-fire target.
Expedient Dry-Fire Method. To do a field-expedient method to dry-fire zero the AN/PAQ-4A aiming light, all a leader needs to remember is the eight M16A2 lengths away, the 41 mm left and 9 mm down of center mass of a target to zero on. Since most of us do not carry a ruler, we have other means to make these measurements. Using a MRE box, mark a cross the length of a protractor or the straight edge of the lensatic compass on the box. Using the 1:50,000 meter scale on the protractor (lensatic compass scale is the same), mark 2,100 meters to the left of the cross intersection and 500 meters down for where the white dot goes (20 mm is equal to 1,000 meters on the 1:50,000 scale on the protractor). To help aim center mass with the iron sights, blacken four squares 1,000 meters above and below the intersection and 1,500 meters left and right of the intersection using the 1:50,000 meter scale.
Dry-Fire Zero Summary Checklist. sights for 300 meters. your daylight-zeroed rifle to 300 meters. "ARI DRY-FIRE ZERO" target or the field-expedient method. rifle is cleared and on safe. supported position, aim your iron sights exactly center mass from 26′ 4" away (eight M16A2 rifle lengths). NVG adjusts your laser beam spot until it covers the white dot on the target. Be sure the goggles are properly adjusted for clear vision. third individual with goggles can be positioned near the target to determine where the beam of the aiming light falls. He can call out needed adjustments to the firer’s buddy. "screw analogy" to adjust the knobs. dry-fire zero procedure, you should hit targets at 100 meters and perhaps out to 200 or 300 meters.
6. AN/PAQ-4C
Characteristics. 0.8 lbs. 600 meters Two AA batteries (BA-3058)
Components. Assembly for the M16A2 and thumbscrew (five-position switch) adjusters (azimuth and elevation) – one for moving beam up/down and the other for moving the beam left/right. mounts to front of aiming light that confines the light in a narrow beam, reducing off-axis radiation. – TM 11-5855-301-12&
Employment Considerations. The aiming light is highly accurate for medium to long ranges (out to approximately 300m) when zeroed properly, using the ARI dry or live-fire zeroing techniques. The zeroing procedure in the technical manual (TM) does not work very well and leaves you with one aiming light not zeroed. Remember, the aiming light can be seen by anyone equipped with NVG, friendly or enemy.
7. MOUNT AND
AN/PAQ-4C can be mounted on the following weapons/weapon systems: include with M203 grenade launcher attached). automatic rifle.
operating procedures are covered in the Operator’s Manual (TM 11-5855-301-12& Section III. 8. ZERO
Procedures for Zeroing. These procedures make three critical assumptions. First, the firer has a good daytime zero with the iron sights. Second, the initial aiming light adjustments have been made so that the firer’s bullets are "on paper" at 25 meters at night. Third, the firer’s NVG are adjusted for best visual acuity. All procedures can be implemented with materials readily available within a unit.
Daylight Zero of Rifles. Any rifle intended for night-time zeroing should also be properly zeroed for daytime firing. In the daylight, zero the M16A2 rifle for 300 meters using the standard 25-meter zeroing procedure (rear sight set to the 300-meter setting plus one clickup toward 400 while zeroing). Use this setting for all 25-meter firing. Reference Task No. 071-311-2030 Zero an M16A2 rifle, STP 21-1-SMCT.
the AN/PAQ-4C for Night-Time Firing. This zeroing procedure involves aiming the iron sights of your daytime zeroed M16A2 rifle at the center of a specially marked zeroing target (placed eight M16A2 rifle lengths, 26 feet-four inches, in front of the muzzle of the rifle) and then adjusting the AN/PAQ-4C aiming light beam to a designated spot that will result in a 250-meter aim light zero. The zero will make the aiming light spot parallel to the strike of the round at 250 meters. It is a nonfiring process so it can be done indoors or outdoors, from subdued light conditions to fully dark. All that is needed is about 30 feet of space. designed AN/PAQ-4C "ARI DRY-FIRE ZERO" target on which a white dot is marked 27 mm below and 17 mm left of center mass of the target (See Figure 4 below. See Chapter 4 of the 82d Abn Div OTN Individual Training Package for a full-sized reproducible copy of the ARI). This is the target to use during the zeroing process. Field expedient methods of zeroing the AN/PAQ-4C will be covered at the end of this section.
with subdued lighting that has a vertical surface (e.g., wall, tree) on which you can attach the 25-meter target. Then measure a distance of 26′ 4" (eight M16A2 rifle lengths) from that vertical surface to the muzzle of your M16A2 rifle. Set up a supported aiming position so that you can hold the rifle very steady while carrying out the AN/PAQ-4C spot adjustment procedure. As soon as it is dim enough for your buddy to see the laser spot clearly with NVG while standing near the target, you can perform the night-time zero.
zeroing procedure will be easier if two soldiers work together. Be sure the rifle is clear and on safe. The shooter, who has daylight-zeroed his weapon, gets into a very steady supported position and lines up his iron sights at center mass on the dry-fire zeroing target. Be sure the rifle is set for 300 meter use (the 3 setting on the rear sight). The buddy will adjust the AN/PAQ-4C knobs to move the spot until it is exactly on top of the white dot at lower left of the target. If it is too dark to see through the iron sights, you can use a flashlight(s) to illuminate the target and perhaps the sights, if necessary.
the beam spot adjustment uses his NVG to see the beam spot. The buddy should try the goggles with and without the pinhole cap on to determine which gives the clearest view of the spot while standing close to the target.
should use the "screw analogy" to adjust the beam. The top knob on the AN/PAQ-4C adjusts the spot up and down. Using the screw analogy, if the top knob were a screw, turning it clockwise would cause it to screw down. Therefore, turning the knob clockwise will adjust the spot down. Likewise, turning a screw counter-clockwise would cause the screw to come up and out of the hole, so the top knob turned counter-clockwise will cause the beam spot to go up. The knob on the left side of the AN/PAQ-4C adjusts the spot left and right. If the knob were a screw, turning it clockwise would cause it to screw in (go to the right). So, turning the knob clockwise will cause the beam spot to move to the right (and counter-clockwise — to the left). If you get confused, think what a screw would do and you will know which way to turn either knob to move the spot where you want (i.e., clockwise = down or into the screw hole {down and right}; counter-clockwise = up or out of the screw hole {up and left}).
beam, it works well to move back and forth to the target so you can see the beam spot location very clearly. Make the necessary adjustments while the shooter is relaxing, then have the shooter get a good center mass aim again and recheck the accuracy of the spot placement (on the white dot). This zeroing process takes only about 5 to 10 minutes.
beneficial to have a third person close to the target using goggles to check the accuracy of the aiming light beam on the dry-fire target. Then the buddy can stand next to the shooter, and simply adjust the aiming light knob in accordance with the directions given by the individual at the dry-fire target. d. Field
Dry-Fire Zero Summary Checklist. sights for 300 meters. your daylight-zeroed rifle to 300 meters. "ARI DRY-FIRE ZERO" target or the field expedient method. rifle is cleared and on safe. supported position, aim your iron sights exactly center mass from 26′ 4" away (eight M16A2 rifle lengths). NVG adjusts your laser beam spot until it covers the white dot on the target. Be sure the goggles are properly adjusted for clear vision. third individual with goggles can be positioned near the target to determine where the beam of the aiming light falls. He can call out needed adjustments to the firer’s buddy. "screw analogy" to adjust the knobs. dry-fire zero procedure, you should hit targets at 100 meters and perhaps out to 200 or 300 meters.
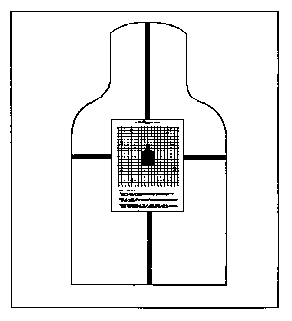
Preparation for Zeroing. the 25-meter zero target. This is the first step in the live-fire zero designed to help the firer determine the center of target mass and maintain a consistent aim point when zeroing. Using the tan side of a cardboard E-silhouette, stripe the full length and width of the cardboard with 3/4-inch black electrical tape. These stripes should divide the E-silhouette in half, vertically and horizontally. Center and staple the 25-meter zero target at the intersection of these black stripes. The zero target can be removed from the E-silhouette and replaced as needed. See Figure 5 for this target configuration.
Marking 25-meter zero target for bullet impact. When zeroing the aiming light, the firer points the aiming light at the center mass of the 25-meter zero target silhouette. Bullets must hit the target at a "unique impact point." Aiming light adjustments are made until the bullets are centered over this unique impact point. This point for the AN/PAQ-4A is at the intersection of line 9 right and line 3 down (3.1 centimeters right and 2.8 centimeters down from the center of the target) on the 25-meter zero target for the M16A2. See Figure 6.
When zeroing the aiming light, the firer points the aiming light at the center mass of the 25-meter zero target silhouette. Bullets must hit the target at a "unique impact point." Aiming light adjustments are made until the bullets are centered over this unique impact point. This point for the AN/PAQ-4C is in the "box" bracketed by lines 3 and 6 right and lines 0 and 1 up (1.55 centimeters right and .45 centimeters above the center of the target) on the 25-meter zero target for the M16A2. See Figure 7.
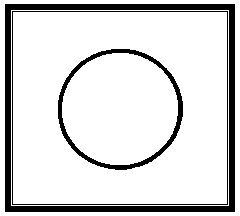
Shot-group Size. The 4 centimeter circle that is centered on the target is not where the impact of the bullets is impacting (remember you are centering the aiming light beam on this). So this circle needs to be centered over the unique point (intersection of line 9 right and line 3 down). Firers are not as precise at night. Research has shown that the 4 centimeter circle is not a realistic standard for night firing, given the reduced visual acuity at night through goggles and the difficulties in aiming consistently. A 5.5 centimeter circle is better. See Figure 8. (See Chapter 4 of the 82d Abn Div OTN Individual Training Package for a full-sized reproducible copy.) This circle can either be transferred directly onto the target, centered over the "unique impact point," or a transparent training aid with a black 5.5 centimeter circle can be used.
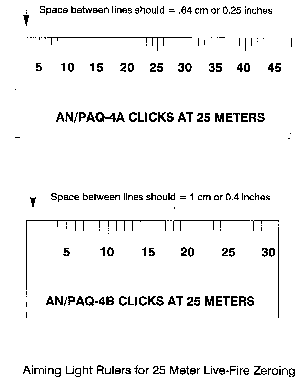
for aiming light adjustments. The next step is to use a 12-inch ruler for determining the number of aiming light click adjustments for windage and elevation. The vertical and horizontal lines on the M16A2 zero target cannot be used. They do not correspond to the click size for the aiming light. Therefore, these lines cannot be used to determine the number of clicks to adjust the aiming light up or down and right or left. When zeroing the AN/PAQ-4A, 1/4" (.64 cm) on the ruler is equal to 1 click at 25 meters on the aiming light adjustment knobs, or 1" at 100 meters. When zeroing the AN/PAQ-4C, 4/10" (1 cm) on the ruler is equal to 1 click at 25 meters on the aiming light adjustment knobs, or 1.6" at 100 meters. Use the ruler to measure the horizontal and vertical distance from the unique impact point to the center of the shot group. During zeroing, place these rulers at each 25-meter target location. See Figure 9 (Not to scale!).
light knob adjustments. The last step in preparation for zeroing is to make a training aid for showing which direction to turn the aiming light knobs to adjust bullets on the bullet impact point. Experience has shown that the markings on the aiming light knobs can be misinterpreted. Bullets can suddenly go off the zero target, off the E-silhouette, or in the wrong direction because the aiming light was adjusted incorrectly. A training aid shown in Figure 10 helps to correct this problem.
Procedures. Standard Army Flashlight to light the target. The flashlight helps to diffuse the bloom of the aiming light in the goggles and provides a more definitive aim point. Place the flashlight at the firer’s position in a V-notched stake. The flashlight can be pointed directly at center mass of the target or slightly below the target, according to the firer’s preference. If the amount of ambient light in the night sky is high, a flashlight may not be needed.
three-round shot groups before making any aiming light adjustments. This will provide a much better indication of the firer’s aim point than a single three-round shot group. This procedure will avoid making premature adjustments and "chasing bullets" in the dark. Triangulate and number each shot group. Determine aiming light click adjustments from center mass of the two shot groups. The goal is to get the shot group within the 5.5 centimeter circle that has either been drawn on the zero target or the transparency is used over the center mass target. Use the aiming light ruler you made up to determine the number of clicks in windage and elevation required to move the strike of the bullet to the desired impact point. Use center mass of the shot group for these measurements. Check the knob adjustment guide to ensure adjustments are made in the correct direction.
Live-fire Zeroing Summary Checklist. E-silhouette on the tan side. 25-meter zero target (that has the offset marked bullet impact point) on the stripes. ruler and shot group transparency (if not already marked on zero target) at each 25-meter target location. light knob adjustment guide at each firer’s position. on 25-meter target from firer’s position. three-round shot groups before the first aiming light adjustment. light ruler to determine number of clicks for adjustments and transparency to evaluate shot group size. adjustment guide for correct adjustments. zeroing (usually 12 rounds), the AN/PAQ-4A is zeroed for 100 meters and the AN/PAQ-4C is zeroed for 250 meters.
|